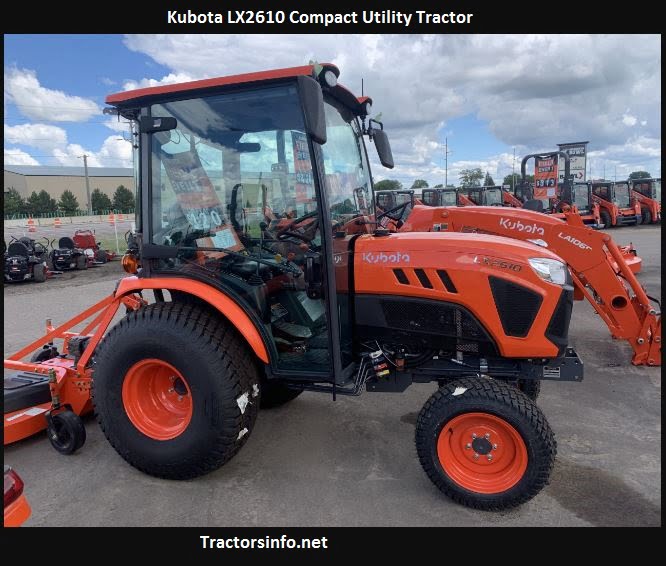
The Kubota LX2610 tractor stands as a symbol of reliability and power in the agricultural landscape. This compact yet powerful machine is prized for its versatility and efficiency in handling various farming tasks, from tilling fields to managing livestock.
Understanding the inner workings of this robust machine is crucial for any owner or operator. With its complexity, occasional issues can arise, impacting its performance and efficiency. Hence, the significance of comprehending and troubleshooting these common problems cannot be overstated.
Importance of Understanding and Troubleshooting Common Issues
Knowing the common problems encountered with the Kubota LX2610 allows owners to preemptively address or efficiently resolve issues. This knowledge not only saves time and money but also ensures uninterrupted operation, minimizing downtime during critical farming seasons.
Overview of What the Blog Will Cover
This comprehensive guide dives deep into the six most prevalent issues faced by Kubota LX2610 owners. Each problem will be meticulously dissected, offering detailed insights into symptoms, potential causes, and step-by-step troubleshooting techniques. From engine glitches to transmission troubles, we’ll leave no stone unturned in addressing these issues.
THE 5 WORST TRACTORS YOU COULD BUY THIS YEAR! TYPES AND MODELS!
Read More: Discover Common Kubota L4760 Problems and How to Solve Them
Understanding the Kubota LX2610
Overview of the Kubota LX2610 Model
The Kubota LX2610 stands tall as a reliable workhorse in the realm of compact tractors. It embodies a blend of power, versatility, and efficiency, making it an indispensable tool for a variety of farming and landscaping tasks.
Key Components and Features
-
Engine: Powered by a durable and fuel-efficient Kubota engine, typically a 3-cylinder, liquid-cooled diesel engine delivering reliable performance.
-
Transmission: Equipped with a hydrostatic transmission (HST), offering seamless speed control and ease of operation, whether in forward or reverse.
-
Hydraulics: Robust hydraulic systems enable the attachment of various implements, facilitating tasks like loading, digging, and lifting with ease.
-
PTO (Power Take-Off): A rear PTO and mid-PTO provide power to attachments, enabling a wide range of agricultural applications, from mowing to tilling.
-
Comfort and Ergonomics: Designed with operator comfort in mind, featuring a spacious platform, ergonomic controls, and a comfortable seat for extended work hours.
Basic Maintenance Practices to Prevent Issues
Maintaining your Kubota LX2610 is vital for optimal performance and longevity. Here are some fundamental maintenance practices:
-
Regular Fluid Checks: Routine examination of engine oil, hydraulic fluid, and coolant levels ensures proper lubrication and cooling, preventing potential issues.
-
Filter Replacements: Timely replacement of air, fuel, and hydraulic filters helps maintain clean systems, preventing contaminants from affecting performance.
-
Inspection of Belts and Hoses: Regularly check belts and hoses for wear and tear, replacing them as needed to prevent breakdowns.
-
Greasing and Lubrication: Properly lubricate moving parts and joints to reduce friction and wear, extending the lifespan of crucial components.
-
Scheduled Servicing: Adhere to manufacturer-recommended service intervals for tasks such as oil changes, fluid flushes, and overall inspections.
By implementing these basic maintenance practices, owners can significantly reduce the likelihood of encountering common issues while ensuring the Kubota LX2610 operates at its peak performance level.
Credit: bro-tek.com
Read More: Discover How to Solve Kubota Tractor Brakes Problems Today
Common Problems and Symptoms
Engine Issues
Symptoms
- Unusual Noises: Rattling, knocking, or grinding sounds emanating from the engine bay.
- Loss of Power: Decreased performance or sudden drops in power while operating.
- Starting Problems: Difficulty starting the engine or frequent stalling.
Potential Causes
- Fuel-related Issues: Contaminated fuel, clogged fuel filters, or air in the fuel system.
- Ignition Problems: Faulty spark plugs, ignition coils, or a malfunctioning ignition system.
- Air Intake or Exhaust Blockages: Clogged air filters or exhaust pipes hindering proper airflow.
Troubleshooting Steps
- Inspect Fuel System: Check for contaminants in fuel, replace fuel filters if necessary, and bleed air from the fuel lines.
- Examine Ignition Components: Test spark plugs and ignition coils for proper functioning, replacing if needed.
- Clear Air Intake and Exhaust: Clean or replace air filters, and inspect the exhaust system for blockages.
Electrical Problems
Symptoms
- Electrical Failures: Lights, gauges, or other electrical components not functioning properly.
- Starting Issues: Difficulty starting the engine, or intermittent starting problems.
- Battery Drain: Rapid battery discharge even when the tractor is not in use.
Potential Causes
- Faulty Wiring: Corroded or damaged wiring, loose connections, or worn-out electrical components.
- Battery Problems: Weak or defective battery, poor connections, or charging system issues.
- Component Failures: Malfunctioning switches, relays, or solenoids affecting electrical circuits.
Troubleshooting Steps
- Inspect Wiring and Connections: Check for loose, damaged, or corroded wires and connections, repairing or replacing as needed.
- Test the Battery and Charging System: Evaluate the battery’s health, connections, and test the alternator for proper charging.
- Check Electrical Components: Test switches, relays, and solenoids to identify malfunctioning components and replace them accordingly.
Hydraulic System Malfunctions
Symptoms
- Sluggish or Erratic Movements: Hydraulic system exhibiting slow or inconsistent operation.
- Leakages: Visible oil leaks or puddles around hydraulic hoses or connections.
- Unresponsive Attachments: Implements not responding or operating as expected.
Potential Causes
- Low Hydraulic Fluid: Insufficient hydraulic fluid levels or contaminated hydraulic oil.
- Damaged Hoses or Seals: Wear and tear on hoses, seals, or connectors leading to leaks.
- Air in the System: Air bubbles trapped in the hydraulic lines, hindering proper operation.
Troubleshooting Steps
- Check Hydraulic Fluid Levels: Ensure proper fluid levels and replace contaminated fluid if necessary.
- Inspect Hoses and Seals: Look for signs of damage, leaks, or worn-out components, replacing as needed.
- Bleed the Hydraulic System: Remove air from the system by bleeding the lines to restore proper hydraulic function.
Transmission Troubles
Symptoms
- Slipping Gears: Difficulty in maintaining consistent speed or gears slipping during operation.
- Unusual Noises: Grinding, whining, or clunking sounds while changing gears or during operation.
- Lack of Power Transfer: Inability to transmit power efficiently to the wheels or implements.
Potential Causes
- Low or Contaminated Transmission Fluid: Insufficient or degraded transmission fluid affecting proper gear engagement.
- Worn Clutch or Transmission Components: Wear and tear on clutch plates or transmission components.
- Hydraulic System Issues: Malfunctioning hydraulic systems affecting transmission performance.
Troubleshooting Steps
- Check Transmission Fluid: Verify transmission fluid levels and quality, replacing or topping up if necessary with the manufacturer-recommended fluid.
- Inspect Clutch and Transmission Components: Examine clutch plates and transmission parts for wear, replacing as needed.
- Evaluate Hydraulic System: Ensure the hydraulic system is functioning correctly, as it plays a vital role in the transmission’s operation.
PTO (Power Take-Off) Problems
Symptoms
- PTO Failure: Inability to engage or disengage the PTO system.
- No Power Transfer: Implements not receiving power or functioning properly.
- Unusual Noises: Grinding or rattling sounds when engaging the PTO system.
Potential Causes
- PTO Clutch Issues: Malfunctioning PTO clutch preventing proper engagement.
- Electrical Problems: Faulty PTO switch, wiring issues, or electrical component failures.
- Mechanical Faults: Wear and tear on PTO components or misalignment affecting its operation.
Troubleshooting Steps
- Inspect PTO Clutch: Check for proper engagement and disengagement, adjusting or replacing the clutch as necessary.
- Test Electrical Components: Verify the functionality of the PTO switch and associated wiring, replacing faulty parts if identified.
- Examine Mechanical Components: Inspect PTO shafts, bearings, and couplings for wear or misalignment, repairing or replacing damaged parts.
Cooling System Issues
Symptoms
- Overheating: Engine temperature rising beyond normal operating levels.
- Coolant Leaks: Visible coolant leaks under the tractor or around the radiator area.
- Poor Heater Performance: Inadequate heat output from the cabin heater during operation.
Potential Causes
- Low Coolant Levels: Insufficient coolant levels due to leaks or evaporation.
- Radiator or Hose Damage: Damaged radiator fins, hoses, or connections leading to coolant leaks.
- Thermostat Malfunction: Faulty thermostat impeding proper coolant flow or regulation.
Troubleshooting Steps
- Check Coolant Levels: Ensure proper coolant levels and top up if necessary with the recommended coolant type.
- Inspect Radiator and Hoses: Look for leaks or damage, repairing or replacing affected components.
- Test Thermostat Functionality: Verify thermostat operation and replace if it’s not functioning correctly.
Read More: Discover Common Kubota Bx2670 Problems and How to Solve Them
Troubleshooting Techniques
General Troubleshooting Tips
-
Refer to the Manual: Always consult the Kubota LX2610’s manual for specific troubleshooting guidance and maintenance schedules.
-
Systematic Approach: Identify symptoms, potential causes, and troubleshoot systematically rather than randomly addressing issues.
-
Keep Records: Maintain a log of maintenance tasks, repairs, and issues encountered for better diagnosis in the future.
-
Use Proper Tools: Ensure you have the right tools for troubleshooting and repairs to prevent damage to components.
-
Take Your Time: Rushing through troubleshooting can lead to oversight; take the time needed for accurate diagnosis and repairs.
Importance of Regular Maintenance
-
Preventative Maintenance: Regular checks and scheduled maintenance help in identifying potential problems before they escalate.
-
Enhanced Longevity: Proper maintenance extends the lifespan of the Kubota LX2610, reducing the frequency of breakdowns and costly repairs.
-
Optimal Performance: Well-maintained tractors operate more efficiently, ensuring maximum productivity during farming tasks.
-
Resale Value: A well-maintained tractor retains higher resale value compared to one with a history of neglect.
Safety Precautions During Troubleshooting
-
Disconnect Power: Before working on electrical components, disconnect the power source to prevent electrical shocks.
-
Wear Protective Gear: Use appropriate safety gear such as gloves, goggles, and ear protection to safeguard against injury.
-
Stable Work Environment: Perform troubleshooting on level ground, ensuring the tractor is safely secured or immobilized to prevent accidents.
-
Follow Procedures: Adhere to recommended procedures outlined in the manual to prevent accidents or further damage to the tractor.
-
Seek Professional Help: If unsure or if the troubleshooting involves complex repairs, consult a certified technician to avoid personal injury or additional damage.
Read More: Discover Common Kubota L4760 Problems and How to Solve Them
DIY Troubleshooting Steps
Engine Issues
Step-by-Step Troubleshooting:
-
Inspect Fuel System:
- Tools Needed: Screwdriver, Fuel line wrench, Fuel filter wrench.
- Procedure:
- Turn off the engine and disconnect the battery.
- Use the fuel line wrench to disconnect the fuel lines.
- Remove and inspect the fuel filter for contaminants.
- Replace the filter if necessary and bleed air from the system.
-
Examine Ignition Components:
- Tools Needed: Spark plug wrench, Multimeter.
- Procedure:
- Remove spark plugs and inspect for wear or fouling.
- Test spark plugs using a multimeter for proper conductivity.
- Replace any faulty spark plugs or ignition coils.
-
Clear Air Intake and Exhaust:
- Tools Needed: Socket set, Air filter cleaner.
- Procedure:
- Use a socket set to remove the air filter cover.
- Clean or replace the air filter, ensuring no blockages.
- Inspect the exhaust system for any obstructions or damage.
Electrical Problems
Step-by-Step Troubleshooting:
-
Inspect Wiring and Connections:
- Tools Needed: Wire cutter/stripper, Electrical tape, Multimeter.
- Procedure:
- Inspect wiring harnesses for damage or wear.
- Use a multimeter to check for continuity in wires and connections.
- Repair or replace damaged wires and connectors as needed.
-
Test the Battery and Charging System:
- Tools Needed: Battery tester, Multimeter.
- Procedure:
- Use a battery tester to check the battery’s voltage and health.
- Test the alternator with a multimeter for proper charging output.
- Replace the battery or alternator if they are not functioning correctly.
Hydraulic System Malfunctions
Step-by-Step Troubleshooting:
-
Check Hydraulic Fluid Levels:
- Tools Needed: Dipstick, Funnel.
- Procedure:
- Locate the hydraulic fluid reservoir and check the levels using a dipstick.
- Top up the fluid using the appropriate type if levels are low or contaminated.
-
Inspect Hoses and Seals:
- Tools Needed: Wrench set, Soap solution.
- Procedure:
- Inspect hydraulic hoses and connections for leaks or damage.
- Use soap solution to identify air bubbles indicating leaks.
- Replace damaged hoses or seals.
Transmission Troubles
Step-by-Step Troubleshooting:
-
Check Transmission Fluid Levels:
- Tools Needed: Socket set, Funnel.
- Procedure:
- Locate the transmission fluid reservoir and check levels using a dipstick or sight glass.
- Top up the transmission fluid with the manufacturer-recommended type if low.
-
Inspect Clutch and Transmission Components:
- Tools Needed: Jack, Socket set, Clutch adjustment tool.
- Procedure:
- Jack up the tractor and secure it properly.
- Inspect clutch plates and transmission parts for wear, adjusting or replacing as needed.
PTO (Power Take-Off) Problems
Step-by-Step Troubleshooting:
-
Inspect PTO Clutch Engagement:
- Tools Needed: Socket set, PTO clutch adjustment tool.
- Procedure:
- Check for proper engagement and disengagement of the PTO clutch.
- Adjust the clutch according to the manufacturer’s specifications.
-
Test Electrical Components:
- Tools Needed: Multimeter, Wiring diagram.
- Procedure:
- Use a multimeter to test the functionality of the PTO switch and associated wiring.
- Replace faulty components or repair wiring issues as identified.
Cooling System Issues
Step-by-Step Troubleshooting:
-
Check Coolant Levels:
- Tools Needed: Coolant tester, Funnel.
- Procedure:
- Use a coolant tester to check the concentration and condition of the coolant.
- Top up or replace coolant if levels are low or quality is compromised.
-
Inspect Radiator and Hoses:
- Tools Needed: Hose clamp pliers, Flashlight.
- Procedure:
- Inspect radiator fins, hoses, and connections for leaks or damage.
- Repair or replace damaged components, ensuring a secure connection.
These detailed DIY troubleshooting steps, complemented by suggested tools, can empower Kubota LX2610 owners to efficiently diagnose and resolve various problems, maintaining the tractor’s optimal functionality.
Read More: Discover How to Solve Kubota Tractor Brakes Problems Today
When to Seek Professional Help
Indications that a Problem Might be Beyond DIY Troubleshooting
-
Complex Electrical Issues: If troubleshooting electrical problems involves intricate wiring or requires specialized equipment beyond basic multimeters, it’s advisable to seek professional help.
-
Hydraulic System Overhaul: Extensive hydraulic system repairs, such as replacing major components or addressing intricate valve issues, may require professional expertise.
-
Transmission or Engine Overhauls: When troubleshooting reveals significant transmission or engine issues requiring disassembly or in-depth repairs, it’s prudent to involve a professional.
-
Uncertainty in Diagnosis: If you are uncertain about the diagnosis or troubleshooting steps, seeking expert guidance can prevent further damage.
-
Safety Concerns: Any situation that poses a safety risk, especially when dealing with heavy machinery or potentially hazardous repairs, warrants professional intervention.
Importance of Contacting a Certified Kubota Technician
-
Expertise and Experience: Certified Kubota technicians possess specialized training and expertise in diagnosing and repairing Kubota tractors, ensuring accurate troubleshooting and efficient repairs.
-
Access to Genuine Parts: Technicians have access to genuine Kubota parts, guaranteeing quality replacements that maintain the tractor’s integrity and performance.
-
Advanced Diagnostic Tools: Certified technicians utilize advanced diagnostic tools and equipment to accurately identify issues and perform precise repairs.
-
Warranty Preservation: Seeking professional help ensures repairs are performed in line with manufacturer standards, preserving any existing warranties on the Kubota LX2610.
-
Safety Assurance: Certified technicians prioritize safety protocols, minimizing risks associated with repairs and ensuring the tractor operates safely post-repair.
While DIY troubleshooting is beneficial for minor issues, recognizing the limitations and knowing when to seek professional assistance is crucial. Engaging a certified Kubota technician ensures accurate diagnosis, quality repairs, and safety compliance, ultimately preserving the longevity and performance of the Kubota LX2610.
Read More: How Long Does Kubota Regen Take?
Maintenance Tips for Long-Term Performance
Routine Maintenance Checklist for Kubota LX2610 Owners
-
Regular Fluid Checks:
- Engine Oil: Check and change as per the manufacturer’s recommendations.
- Hydraulic Fluid: Monitor levels and quality, topping up or replacing as needed.
- Coolant: Inspect levels and quality regularly, maintaining proper concentration.
-
Filter Replacements:
- Air Filter: Clean or replace as per the maintenance schedule to ensure proper airflow.
- Fuel Filter: Regularly inspect and replace to prevent contaminants from affecting the engine.
-
Inspection of Belts and Hoses:
- Drive Belts: Check for wear and tension, replacing if signs of deterioration appear.
- Hoses: Regularly inspect for leaks, cracks, or signs of aging, replacing as needed.
-
Lubrication and Greasing:
- Moving Parts: Regularly grease fittings and pivot points to reduce friction and wear.
-
Scheduled Servicing:
- Adhere to Service Intervals: Follow the manufacturer’s recommended service schedule for oil changes, filter replacements, and overall inspections.
Best Practices for Keeping the Tractor in Optimal Condition
-
Store in a Sheltered Area:
- Park the tractor in a covered area or under a shed to protect it from harsh weather conditions, preventing premature wear and corrosion.
-
Cleanliness and Maintenance Records:
- Regularly clean the tractor to remove dirt and debris, preventing damage and aiding in visual inspections.
- Maintain a detailed record of maintenance activities, aiding in tracking and scheduling future service needs.
-
Proper Operation and Handling:
- Operate the tractor within recommended load capacities and operating parameters, avoiding overloading that could strain components.
-
Winterization and Seasonal Preparation:
- Before winter, ensure the tractor is properly winterized, including checking antifreeze levels and other winter maintenance steps recommended in the manual.
- In spring, perform thorough inspections and tune-ups after seasonal storage to ensure optimal performance.
-
Professional Inspections:
- Periodically schedule professional inspections by certified technicians to assess the tractor’s condition and address any potential issues proactively.
Regular maintenance is key to ensuring the Kubota LX2610 operates at its peak performance and longevity. By adhering to a routine maintenance checklist and adopting best practices, owners can maximize the tractor’s efficiency, minimize downtime, and extend its lifespan significantly.
Read More: How Much are Kubota Tractors: A Comprehensive Guide for Buyers
Conclusion
Owning a Kubota LX2610 tractor signifies not just a piece of machinery but an investment in efficiency, reliability, and productivity within the agricultural landscape. However, like any mechanical equipment, it’s prone to occasional issues that can disrupt its performance. Understanding these issues, troubleshooting effectively, and maintaining the tractor optimally are vital for its longevity and consistent functionality.
Throughout this guide, we’ve explored the various common problems encountered with the Kubota LX2610 and provided detailed DIY troubleshooting steps. From engine glitches to electrical malfunctions, hydraulic system issues to transmission troubles, addressing these problems systematically can significantly enhance the tractor’s performance and minimize downtime.
Maintenance plays an equally pivotal role in the tractor’s long-term health. The routine maintenance checklist outlined here, encompassing fluid checks, filter replacements, inspections of belts and hoses, and adherence to scheduled servicing, forms the backbone of proactive care for the Kubota LX2610.
Moreover, implementing best practices such as sheltering the tractor, maintaining cleanliness, following proper operation guidelines, and seeking professional inspections ensures that the Kubota LX2610 remains a reliable partner in your farming endeavors.
Remember, knowing when to seek professional help, especially in cases of complex issues beyond DIY troubleshooting, is crucial. Engaging a certified Kubota technician guarantees precision in diagnosis, quality repairs, and compliance with safety standards, thereby safeguarding the tractor’s longevity and performance.
By following the guidelines outlined in this comprehensive troubleshooting and maintenance guide, Kubota LX2610 owners can foster a relationship of trust and reliability with their tractors. Proactive care, regular inspections, and timely interventions will not only keep the tractor running smoothly but also ensure its continued efficiency and productivity on the field for years to come.
So, here’s to harnessing the full potential of the Kubota LX2610 – a testament to efficiency and reliability in the world of farming machinery!